0%

Promise (III) - chaining

本文開始

這一篇文章有提到,以前的 JS 要利用 callback function 來安排非同步功能的執行先後順序的時候,很容易就會形成 callback hell 的問題,而 Promise 的 chaining 功能就可以很好的解決這個問題。

所以,本文內文即為記錄此篇教學文提及有關 Promise chaining 的部分。

這邊就來個 Promise chaining 的範例

1
2
3
4
5
6
7
8
9
10
11
12
13
14
15
new Promise((resolve, reject) => {
setTimeout(() => resolve(1), 2000); // step 1
})
.then(res => { // step 2
alert(res); // 1
return res * 2;
})
.then(res => { // step 3
alert(res); // 2
return res*2;
})
.then(res => { // step 4
alert(res); // 4
return res*2;
})

來解析一下,上面範例,透過 then 形成的 Promise chaining 的執行過程

  1. 最一開始的 Promise 會呼叫 resolve 並將結果 1 往後面的 stream 傳遞
  2. 接著,step 2 的 .then 啟動,當它回傳值的時候,會自動創出一個 Promise 物件,並夾帶回傳的內容,以上面範例來講的話, step 2 的 .then 會創出一個 Promise 物件,並夾帶 result * 2 的值。
  3. 接著,step 3 的 .then 啟動,並自動創出一個 Promise 物件,夾帶著回傳的內容,傳到後面的 stream 。
  4. … and so on

所以,上面的範例在各 .then 的值的傳遞過程為
1 → 2 → 4

⭐ 我們可以這樣以 .then 做出一個 Promise chaining 的效果,就是因為 .then 會自動回傳一個 Promise 物件,如此一來,我們才能在後面繼續用其他 .then 串接起來。

Returning Promises

雖然,上面的範例展示了 then 可以自動回傳 promise 物件,但是,這樣自動回傳的 Promise 物件我們就沒辦法做一些額外的操作,比如希望延遲幾秒後才啟動後面的 .then

那這個時候,我們就可以利用傳入 .then 的 function,來製作要回傳的 Promise 物件,進而在這個要回傳的 Promise 物件的 executor 中,做一些我們想要的操作。

直接上範例

1
2
3
4
5
6
7
8
9
10
11
12
13
14
15
16
17
18
new Promise((resolve, reject) => {
setTimeout(() => resolve(1), 2000);
})
.then((res) => {
alert(res);
return new Promise((resolve, reject) => { // step 1
setTimeout(() => resolve(res * 2), 1500);
})
})
.then((res) => {
alert(res);
return new Promise((resolve, reject) => { // step 2
setTimeout(() => resolve(res * 2), 1500);
})
})
.then((res) => {
alert(res);
})

這個範例執行的步驟流程跟之前範例的流程完全一樣,只不過我們透過傳入 .then 的 function 回傳新的 Promise 物件,並在其內部的 executor 裡面定義 setTimeout function,來操縱後面的 .then 會被延遲啟動,因為, .then 一定要等前方的 Promise 的狀態為 settled 時,才會被啟動。

這個範例的結果傳遞過程一樣為 1 → 2 → 4

而這樣的效果,就可以讓我們做出一個由非同步動作串聯起來的 Promise chaining。

Example: loadScript

在教學文章有提及到了 loadScript 的範例,並利用 Promise chaining 來撰寫它

1
2
3
4
5
6
7
8
9
10
11
12
13
14
15
16
17
18
19
20
21
22
23
24
function loadScript(src) {
return new Promise((resolve, reject) => {
const script = document.createElement('script');
script.src = src;

script.onload = () => resolve(script)
script.onerror = () => reject(new Error(`Script load error for ${src}`))

document.head.append(script)
})
}

loadScript("https://cdnjs.cloudflare.com/ajax/libs/lodash.js/4.17.11/lodash.js")
.then(script => {
alert(`${script.src} is loaded - 1`)
return loadScript("https://cdnjs.cloudflare.com/ajax/libs/lodash.js/4.17.11/lodash.js")
})
.then(script => {
alert(`${script.src} is loaded - 2`)
return loadScript("https://cdnjs.cloudflare.com/ajax/libs/lodash.js/4.17.11/lodash.js")
})
.then(script => {
alert(`${script.src} is loaded - 3`)
})

可以發現用這樣的 .then 的 chaining 寫法,程式碼就不會往右邊成長,而是往下串接,這樣子也就解決了 callback hell 的問題囉。

.callback hell 臭味的 promise chaining 寫法

而上面的 .then 部分也可以用下面這種寫法

1
2
3
4
5
6
7
8
9
10
11
12
13
14
loadScript("https://cdnjs.cloudflare.com/ajax/libs/lodash.js/4.17.11/lodash.js")
.then(script => { // ourter function
alert(`${script.src} is loaded - 1`)

loadScript("https://cdnjs.cloudflare.com/ajax/libs/lodash.js/4.17.11/lodash.js")
.then(script => { // nested function 1
alert(`${script.src} is loaded - 2`)

loadScript("https://cdnjs.cloudflare.com/ajax/libs/lodash.js/4.17.11/lodash.js")
.then(script => { // nested function 2
alert(`${script.src} is loaded - 3`)
})
})
})

這樣的寫法,是不是有點 callback hell 的臭味出現😅,
但是,這樣的寫法,有一個好處,就是內部巢狀的 .then 的 handler function 可以拿到外圍的 .then 的變數內容,

什麼意思呢?

以上面的範例為例,
nested function 1 可以拿到 outer function 的 script 內容,
nested function 2 可以拿到 outer function 的 script 內容 和 nested function 1 的 script 內容。

就取決於你的情境你需要怎麼使用。

❗ Thenables

準確一點來說,在傳入 then 的 handler function 它回傳的內容不一定要是 Promise 物件,
而是叫做 thenable 的物件,也就是該物件自身也擁有一個叫做 .then 的成員函式,如此一來它也可以像 Promise 物件一樣,使用 .then 方法,並做出 chaining 的效果。

這個 thenable 物件的想法,可能會被用在某些第三方套件,它們會自製屬於他們自己的 promise-compatible(可以跟 promise 一起使用的) 物件。
如此一來,第三方套件可以在這些自製的 thenable 物件中,定義屬於它們自己需要使用的方法,還可以跟原生 JS 的 promise 合在一起使用。

以下就是 thenable 物件的製作範例

1
2
3
4
5
6
7
8
9
10
11
12
13
14
15
16
17
18
19
class Thenable {
constructor(num) {
this.num = num;
}

then(resolve, reject) {
alert(resolve); // 顯示 function() { native code }
// 1 秒後,resolve 出 this.num *2 的值
setTimeout(() => resolve(this.num *2), 1000); // step 2
}
}

new Promise((resolve, reject) => {
setTimeout(() => resolve(1), 1000);
})
.then(result => {
return new Thenable(result) // step 1
})
.then(result => alert(result)) // 一秒後顯示 2

上面範例執行的過程

.在 step 1 回傳自製的 Thenable 物件,並使用它的 then 成員方法

.接著,在 Thenable 物件的 then 方法中,傳入 result => alert(result)
所以,在 Thenable 物件的 alert(resolve) 部分,才會顯示 function() { native code }

.執行在 setTimeoout(() =>resolve(this.num *2), 1000) ,並在 1 秒後呼叫 resolve(this.num * 2) ,可以看的出來我們將 this.num *2 當作參數傳入 resolve function 裡面,
接著,會傳入到 result => alert(result) 的 alert(result) 裡面,這也就是為什麼一秒後會顯示 2 的原因。

Bigger example: fetch

教學文章又用了一個時常在專案中會使用到的取得 server 資料的方法 fetch 作為範例。
fetch 最基本的用法,就是下方這個寫法

1
const promise = fetch(url)

上面這個內容,就是去 url 這個地方去取得資料,並在完成取得資料後,會回傳一個 Promise 物件。

在 fetch 回傳的 promise 物件,我們會利用 response.text() 這個方法,來解析出回傳回來的內容,如果直接用 console.log 取看 response 會發現它是 [object Response] 的內容。

直接先上範例

1
2
3
fetch('https://javascript.info/article/promise-chaining/user.json')
.then(response => response.text())
.then(text => alert(text))

但是, response.text() 回傳的會是 string 型別,我們無法以物件的方式去取得它裡面的屬性內容。
所以,我們會使用另外一個 response.json() 將回傳的內容轉成 json 格式,如此一來就可調用回傳物件的屬性值囉。

1
2
3
fetch('https://javascript.info/article/promise-chaining/user.json')
.then(response => response.json())
.then(user => alert(user.name))

接下來,改變一下上面的範例

1
2
3
4
5
6
7
8
9
10
11
12
13
14
15
16
fetch('https://randomuser.me/api/')
.then(response => response.json())
.then(user => { // step 1
const img = document.createElement('img');
img.src = user.results[0].picture.large;
document.body.append(img);
setTimeout(() => {
img.remove();
let userName = '';
Object.keys(user.results[0].name).forEach(key => {
userName += user.results[0].name[`${key}`] + ' '
})
resolve(userName);
}, 3000)
})
.then(userName => alert(`Showing ${userName}`)) // step 2

先講一下,這邊的範例,試圖要做到的效果是,
圖片出現三秒之後,跳出彈窗,顯示使用者個名稱,並且在按下彈窗的 ok 鍵後,把圖片刪掉。

但是!!!

上面的範例,不會是我們想要的執行效果,step 1 執行完之後,會立馬執行 step 2 的 .then 內容,而這個 step 2 的 userName 會是 undefined。
接著,圖片 load 完成出後,等三秒被刪掉,但是,resolve 的內容就不會被執行。

以上的問題反映了,我們需要把 then 執行的時機點也延遲三秒。
那我們就要回憶一下 then 執行的時機點會是在前一個 Promise 物件 settled 之後,才會執行,那代表我們只要把前面的 Promise 物件延遲 3 秒後才改成 settled 的狀態,如此一來就能達到我們想要的效果。接著,上面的範例,如果,我們希望在顯示完 user 的圖片之後,再跳個提示窗的話,我們就要再加入一些下面的內容

所以,我們要改一下上面的範例

1
2
3
4
5
6
7
8
9
10
11
12
13
14
15
16
17
18
19
fetch('https://randomuser.me/api/')
.then(response => response.json())
.then(user => {
const img = document.createElement('img');
img.src = user.results[0].picture.large;
document.body.append(img);
return new Promise((resolve, reject) => {
setTimeout(() => {
img.remove();
img.className = 'img-decorate';
let userName = '';
Object.keys(user.results[0].name).forEach(key => {
userName += user.results[0].name[`${key}`] + ' ';
})
resolve(userName);
}, 3000)
})
})
.then(userName => alert(`Showing ${userName}`))

經過上面的改動就可以變成我們想要的效果。
透過回傳一個新的 Promise 物件,如此一來,後面 chaining 的 then 就會等這個新的 Promise 物件 settled 之後,才執行 alert 的功能。

最後,把上面的範例,分成好幾個 function,來讓這個一連串的 Promise chaining 動作,更有可讀性

1
2
3
4
5
6
7
8
9
10
11
12
13
14
15
16
17
18
19
20
21
22
23
24
function loadJson(url) {
return fetch(url)
.then(response => response.json());
}

function showAvatar(user) {
const img = document.createElement('img');
img.src = user.results[0].picture.large;
document.body.append(img);
return new Promise((resolve, reject) => {
setTimeout(() => {
img.remove();
let userName = '';
Object.keys(user.results[0].name).forEach(key => {
userName = user.results[0].name[`${key}`] + ' ';
})
resolve(userName);
}, 2000)
})
}

loadJson('https://randomuser.me/api/')
.then(user => showAvatar(user))
.then(userName => alert(userName))

以上就改完囉~

Conclusion

  1. 可以利用 promise chaining 來解決 callback hell 的問題。
  2. 可以達成 promise chaining 的功能是因為 .then 會回傳 promise 物件,如此一來,才能在後面接 .then 以達到 chaining 的功能。

以下為依據 .then 回傳的結果來執行相對應的 handler 的圖
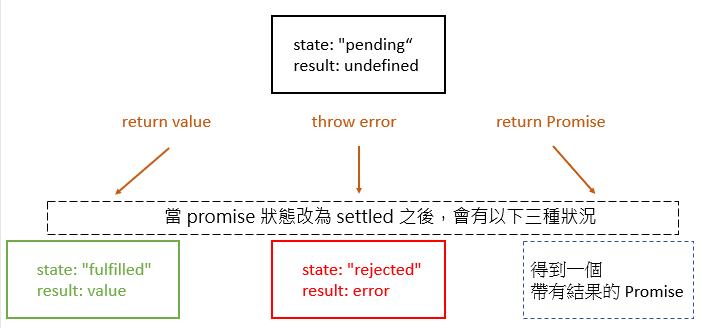
promise_chaining

Reference

  1. https://javascript.info/promise-chaining