學習目標
- 製作出一個可以讓其他人都可以共通使用的彈窗共用元件。 (singleton service 的區分)
- 利用彈窗元件的 service 來切換彈窗元件的 class 內容。
範例專案整體架構
在這篇文章中,我使用的範例專案架構主要有兩個頁面,分別為 index 和 test 頁面,並在這兩個頁面都使用彈窗元件,並在各自頁面中的彈窗元件中塞入各自的內容。
這邊我就先不詳細說明怎麼創出 index 和 test 元件,並用路由在彼此頁面之間做切換,因為,本篇主要是著重在紀錄如何實作出彈窗共用元件。
實現元件共用的方法
實作方法如下:
Step1. 先創出彈窗元件所需要的檔案ng g c modal
以上指令會在專案中創出一個叫做 modal 的元件
ng g service modal
以上指令會在剛剛的 modal 元件資料夾中創出一個叫 modal.service.ts 的檔案。
我們會在這個 service 檔案裡面寫入操縱此 modal 的方法。
ng g module modal
以上指令會在剛剛的 modal 元件資料夾中創出一個叫 modal.module.ts 的檔案。
我們會在這個 module ,宣告(declaration) 彈窗元件,最後,再由這個 module 輸出(export) 彈窗元件,讓其他地方皆可調用彈窗元件。
經過以上三個指令,modal 元件資料夾裡面的內容會長的像這樣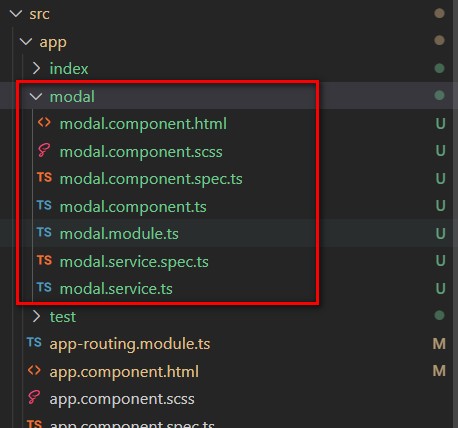
Step2. 實作 modal 出現與遮罩的效果
要達成這部分的效果,都是在 modal 的 class 中加減 show 這個 className,來達成切換 modal 是否出現的效果。
在這邊我們就會透過 service 來達到加減 show 這個 className 的效果。
那在這邊我們就不得不提到 singleton service 的概念囉。
Singleton Service
當我們直接利用 AngularCLI 的 ng g service modal 指令創出來的 modal.service.ts 檔案中,你可以注意看一下檔案的最上方有有關 @Injectable 的內容:
1 | import { Injectable } from '@angular/core'; |
有看到 @Injectable 中的 providedIn 屬性是 root ,這代表這個 service 會直接注入到 app 的底層,整個專案裡面只會有一個這個 service,這就叫做 singleton service。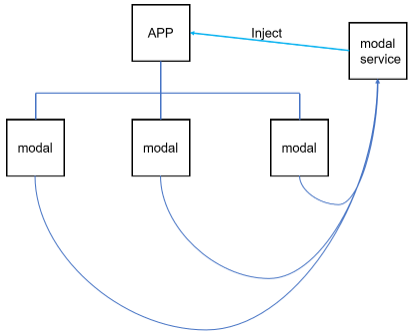
但是,我們現在想要達成的共用元件的 service 並不是 singleton service。
我們希望每一個 modal 元件,都有屬於自己的 service。這代表如果今天有三個 modal 元件,我們就會分別為這三個 modal 元件注入 modal.service,所以,整個專案就只會有這三個
modal 元件擁有 modal.service。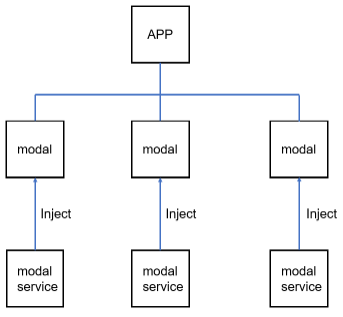
好,那知道了,我們想要達成的 service 模式,那就要改寫一下,modal.service.ts 和 modal.component.ts 的內容
1 | // --- modal.service.ts --- // |
可以看到我們先把 modal.service.ts 裡面有關 @Injectable 和 provideIn:’root’ 的部分註解掉,讓它不再是 singleton service。
1 | // --- modal.component.ts --- // |
我們在 modal 元件中注入 ModalService,並利用 providers 屬性,來將 ModalService 注入到 modal 元件裡面。
接著,在 modal 元件的 constructor 中,寫入 public modalService: ModalService,讓 modal 元件擁有一份 modalService 的實例,如此一來,我們就可以在 modal 元件裡面調用 modal.service 的方法,來達成切換 modal 元件的 class 內容。
利用 service 切換元件 class 內容
接下來,我們就要在 modal.service 加入切換 modal 元件的方法。
1 | // --- modal.service.ts --- // |
以上的範例,我們定義了一個 subject 物件叫做 show,然後,定義了兩個函式 open 和 close,用來發送這個 subject 的值,分別發送 true 和 false。我們會利用 show 的 true 或 false 來切換 modal 元件的 class 內容。
modal 元件切換 class 內容
接下來,我們就要在 modal 元件裡面利用 modal.service 來切換 modal 元件的 class 內容。
1 | // --- modal.component.ts --- // |
1 | // --- modal.component.html --- // |
在 modal.component.ts 有定義 close 和 open 的函式,來切換它所有有的 modalService 的 show 的值。最後,再利用 get show 來接收 modalService.show 當前的值。
在 modal.component.html 中,我們在 class="modal" 的那一個標籤中加入了當 show 的值為 true 的時候,就為 class 加入 show。而後面的有一個 async 的 pipe ,是因為 show 是 subject 型別,要用 async 的方式來接它的值。
結論
本篇文章內容,只有先介紹怎麼實現在 Angular 中,製作 modal 共用元件的概念。
主要有提到以下概念
- 不使用 singleton service 的方式來將 service 注入到 modal 元件,好讓每一個 modal 元件都有專屬的 modal.service。
- 在 modal 元件中定義 open 和 close 函式來切換來自 modalService 的 show 變數值,並透過 [class.show] 來接 show 的值,進而達到在 modal 的 class 中加減 show 的效果。