Vue.js元件概念介紹 外層要傳遞資料到內層的時候,會用一個叫props的方法,emit Event的方法,emit事件。emit Event才能將資料往外層送。
SPA的概念是由元件的概念所構成的,所以,元件在Vue.js中是一個很重要的部分。
使用 x-template 建立元件 首先,我們先使用x-template的寫法來使用自訂義的元件
1
2
3
4
5
6
7
8
9
10
11
12
13
14
15
16
17
18
19
20
21
22
23
24
25
26
27
28
29
30
31
32
33
34
35
36
37
38
39
40
41
42
43
44
45
46
47
48
49
50
51
52
53
---HTML--- <div id="app"> <table class="table"> <thead> </thead> <tbody> <row-component v-for="(item,key) in data" :key="key></row-component> </tbody> </table> </div> ---JavaScript--- <script type="text/x-template" id="rowComponenttemplate"> <tr> <td>{{ item.name }}</td> <td>{{ item.cash }}</td> <td>{{ item.icash }}</td> </tr> </script> <script> Vue.component('row-component',{ template:'#rowComponenttemplate' }); var app = new Vue({ el: '#app', data:{ data:[ { name: '小明', cash: 100, icash: 500, }, { name: '杰倫', cash: 10000, icash: 5000, }, { name: '漂亮阿姨', cash: 500, icash: 500, }, { name: '老媽', cash: 10000, icash: 100, }, ] } }) </script>
以上的內容,可以看到我們額外寫了一個特別給x-template來撰寫,id來跟Vue的row-component自訂義元件來做綁定。x-template的區域中,放入了tr td的內容,也就是我們想要製作的部分。props的技巧,將外部的資料送進去裡面囉。
第一步,props 引入媒介屬性 將以上的範例修改成以下這樣子
1
2
3
4
5
6
7
8
9
10
11
12
13
14
15
16
17
18
19
20
21
22
23
24
25
26
27
28
29
30
31
32
33
34
35
36
37
38
39
40
41
42
43
44
45
46
47
48
49
50
51
---HTML--- <div id="app"> <table class="table> <thead></thead> <tbody> <row-component v-for="(item, key) in data" :person="item" :key="key"</row-component> // 加入:person綁定 </tbody> </table> </div> ---JavaScript--- <script type="text/x-template" id="rowComponenttemplate"> <tr> <td>{{person.name}}</td> // 將原本的item改成你綁定的屬性名稱person <td>{{person.age}}</td> // 將原本的item改成你綁定的屬性名稱person <td>{{person.cash}}</td> // 將原本的item改成你綁定的屬性名稱person </tr> </script> <script> Vue.component('row-component',{ props:['person'], // 加入props,且用陣列的寫法 template: '#rowComponenttemplate' }) var app= new Vue({ el: '#app', data:{ data:[ { name: '小明', cash: 100, icash: 500, }, { name: '杰倫', cash: 10000, icash: 5000, }, { name: '漂亮阿姨', cash: 500, icash: 500, }, { name: '老媽', cash: 10000, icash: 100, }, ] } }) </script>
以上修改的地方,特別是在元件的定義內容中,新增props,且props是要用陣列的方式將你想要綁定的屬性名稱加進去。v-bind來綁定你想由外往內傳的資料,像這邊就是綁定外層的data陣列的元素item。
第二步,利用is 引入Vue自訂義元件-使元件呈現正確的HTML布局 但是,你發現上面的資料呈現方式並沒有按照表格的布局方式,正確的呈現內容。<tbody>裡面就是要放<tr>,而在<tr>裡面就是要放<td>,<tbody>加入我們自訂義的元件,當然,就無法呈現正確的布局。is來引入我們的元件,進而讓整體布局是正確的。
1
2
3
4
5
6
7
8
9
10
---HTML--- <div id="app"> <table class="table"> <thead> </thead> <tbody> <tr is="row-component" v-for="(item, key) in data" :person="item" :key="key"></tr> </tbody> </table> </div>
可以看到,我們直接在tr標籤中加入is去綁定我們自訂義的元件,接著,後面的v-for和:person寫法都和之前的一樣。
將Vue的自訂義元件改成局部註冊 上面的範例是用全域的範圍中,註冊我們自訂義的Vue元件。script的部分
1
2
3
4
5
6
7
8
9
10
11
12
13
14
15
16
17
18
19
20
21
22
23
24
25
26
27
28
29
30
31
32
33
34
35
36
37
38
39
40
41
42
43
44
<script> /* 把原本全域註冊的部分註解掉 Vue.component('row-component',{ props:['person'], // 加入props,且用陣列的寫法 template:'#rowComponenttemplate' }); */ var child = { // 新增一個物件,裡面放的就是自訂義元件中的物件內容 props:['person'], template:'#rowComponenttemplate' } var app = new Vue({ el: '#app', data:{ data:[ { name: '小明', cash: 100, icash: 500, }, { name: '杰倫', cash: 10000, icash: 5000, }, { name: '漂亮阿姨', cash: 500, icash: 500, }, { name: '老媽', cash: 10000, icash: 100, }, ] }, components:{ // 將我們定義的物件丟進components中 'row-component': child } }) </script>
以上例子,先將原本的自訂義元件中的物件引數的內容,改為由另為一個變數child存起來。components成員屬性底下,
使用 function return 建構資料格式 當你自訂義元件的時候,要調用它自身的屬性值的時候,必須要用function return的方式,來取得該屬性值,
1
2
3
4
5
6
7
8
9
10
11
12
13
14
15
16
17
18
19
20
21
22
23
24
25
26
27
28
29
---HTML--- <div id="app"> <counter-component></counter-component> <counter-component></counter-component> <counter-component></counter-component> </div> ---JavaScript--- <script type="text/x-template" id="counter-component"> <div> 你已經點擊 <button class="btn btn-outline-secondary btn-sm" @click="counter += 1">{{ counter }}</button> 下。 </div> </script> <script> Vue.component('counter-component', { data: function(){ return { counter:0 } } , template: '#counter-component' }) var app = new Vue({ el: '#app', }); </script>
以上可以看到元件’counter-component’的成員屬性counter,是用function return的方式來取得它的值的。
props 基本觀念 在這部分展示透過props將外界的資料傳入元件中,並呈現靜態傳遞與動態傳遞寫法上的差異
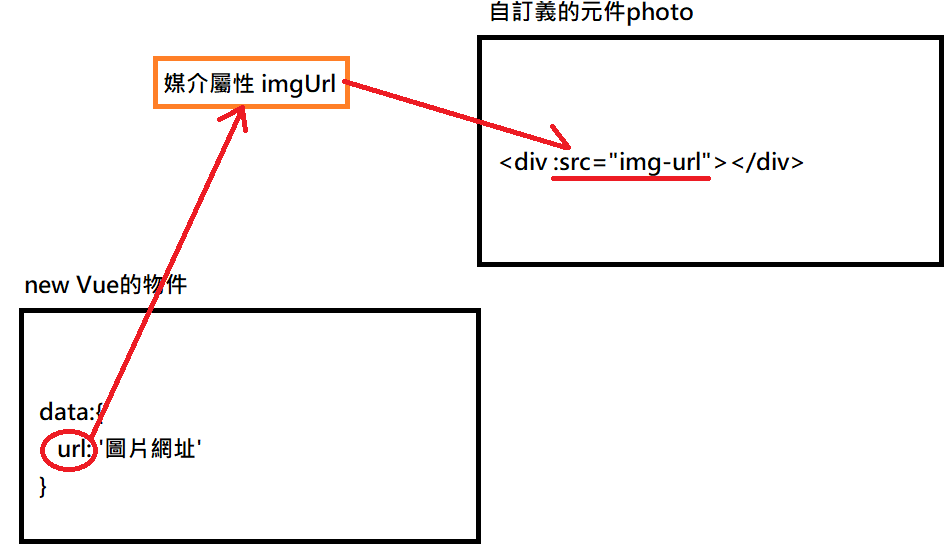
動態傳遞的概念像這張圖片一樣。props為這個元件創了一個媒介屬性叫imgUrl。x-template中定義photo元件的內部內容,x-template裡面的img標籤,它的src屬性利用v-bind跟photo元件的媒介屬性imgUrl綁定在一起。
小駝峰寫法 在上面這個範例要注意的地方,在JavaScript文件中,photo元件的props新增媒介屬性是用駝峰式的寫法imgUrl,
:src=”圖片網址” 而不是 src=”圖片網址” 上面這個範例在x-template裡面是用:src來跟媒介屬性來做綁定(透過v-bind),不要跟一般的src的屬性使用搞混囉,一般的src屬性後面就直接接網址了,沒有在綁定變數的。
